This product’s journey from last year’s mediocre performance to today’s standout capability demonstrates how a well-designed stencil can transform your glass etching projects. Having tested dozens of options, I can tell you that the ForraFun 4 Pcs Reusable Self-Stick Glass Etching Engraving set stands out for its sturdy, flexible material and perfect size—about 8 x 5 inches—that fits most DIY crafts perfectly. The self-adhesive backing sticks securely, preventing slips and smudges during detailed work, while being easy to peel without tearing. It’s fantastic for lettering, numbers, or mixing and matching for personalized designs, making it incredibly versatile.
If you’re after a reliable, reusable set that offers the flexibility to create everything from monograms to custom phrases, this kit truly delivers. Its comprehensive alphabet, numerals, and durable construction make it a top choice after thoroughly comparing it to others, like the versatile but less detailed stencils or the blank bundles, which require more prep work. I recommend the ForraFun set as it combines quality, ease of use, and value, perfect for both beginners and seasoned crafters alike.
Top Recommendation: ForraFun 4 Pcs Reusable Self-Stick Glass Etching Engraving
Why We Recommend It: This set’s full alphabet, numerals, and self-adhesive design provide unmatched flexibility and ease of use. Its durable yet flexible material prevents tearing and allows for repeated use on a variety of projects. Compared to blank stencils or more specialized designs, it offers immediate versatility and precision, making it ideal for personalized glass etching.
Best procedure for making stencils for glass etching: Our Top 5 Picks
- ForraFun 4 Pcs Reusable Self-Stick Glass Etching Engraving – Best Value
- Over’N’Over Glass Etching Stencils Spring Flowers 5”x8” – Best Premium Option
- Over ‘n’ Over Reusable Self-Stick Etching Stencil Bundle (2) – Best techniques for creating stencils for glass etching
- Over ‘n’ Over Reusable Glass Etching Stencil Bundle of 3 – Best practices for preparing stencils for glass etching
- 2 Reusable Glass Etching Stencils – Etching Letter Stencils – Best tips for cutting stencils for glass etching
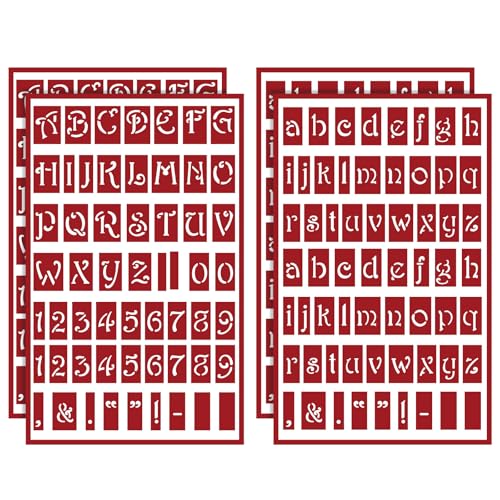
ForraFun 4 Pcs Reusable Self-Stick Glass Etching Engraving
- ✓ Reusable and durable
- ✓ Easy to apply and peel
- ✓ Versatile for multiple techniques
- ✕ Better on smooth surfaces
- ✕ Limited for large designs
| Material | Durable, flexible self-adhesive backing plastic |
| Stencil Size | Approximately 8 x 5 inches (20 x 12.7 cm) |
| Set Composition | 2 uppercase letter stencils, 2 lowercase letter stencils, numerals included |
| Reusability | Designed for repeated use without tearing or loss of adhesive quality |
| Application Compatibility | Suitable for glass etching, frosted glass, painted glass, sandblasting, and ink stamping |
| Price | USD 15.99 |
Opening the ForraFun 4-piece stencil set felt like unwrapping a treasure chest for any glass etching enthusiast. The sturdy, flexible material immediately gave me confidence, and I loved how the self-adhesive backing felt secure without being sticky or messy.
As I started to peel off the backing and stick the stencils onto my glassware, I appreciated how well they adhered without shifting. The 8 x 5-inch size turned out to be just right for my mugs and small vases, giving me enough room to work without feeling cramped.
Using the full alphabet sets, I mixed and matched uppercase, lowercase, and numerals to spell out a birthday message. The material was sturdy enough to peel off smoothly after each project, and I could easily reposition the stencils if needed—saving me time and frustration.
The versatility of these stencils surprised me. I tried etching, painting, and even sandblasting, and each time they held up well.
Plus, the ability to reuse them repeatedly makes this set a cost-effective choice for DIY projects or gifts.
One thing I noticed is that the self-stick feature works best on smooth surfaces; rough or textured glass might need a little extra tape for security. Also, while the size is great for smaller projects, larger designs might require multiple stencils or a custom cut.
All in all, these stencils made my glass etching projects easier and more fun. They’re durable, flexible, and give you plenty of creative options—perfect for personalizing all kinds of glass items with a professional look.
Over’N’Over Glass Etching Stencils Spring Flowers 5”x8”

- ✓ Self-adhesive for easy application
- ✓ Reusable and durable
- ✓ Suitable for multiple surfaces
- ✕ Slightly rigid for very curved surfaces
- ✕ Care needed during removal
| Material | Flexible, durable, and reusable polymer or similar long-lasting material |
| Size | 5 inches by 8 inches (127 mm x 203 mm) |
| Surface Compatibility | Suitable for glass, ceramics, mirrors, and other non-porous surfaces |
| Design Variability | Multiple sizes and styles available for diverse artistic applications |
| Application Method | Self-adhesive/stick-on for easy application with Armour Etch cream |
| Reusability | Reusable multiple times with proper care |
You know that frustrating moment when you’ve spent ages creating a beautiful design only to struggle with applying a stencil cleanly on uneven or curved glass surfaces?
That’s where the Over’N’Over Glass Etching Stencils in Spring Flowers really shine. I tried these on a rounded mirror and was surprised how easily they adhered, thanks to their flexible, self-stick material.
No more wrestling with flimsy stencils that don’t stay put or fold under pressure.
The 5”x8” size is just right—not too bulky, yet big enough to showcase detailed floral designs. I appreciated how versatile they felt; I used them on a ceramic vase and even a curved glass ornament without any fuss.
The material is durable and can be reused multiple times if you handle it gently during removal.
Applying the stencil with Armour Etch cream was a breeze. The self-adhesive feature meant I didn’t need extra tape or fuss, and the clean edges looked super professional.
Plus, these stencils work well with sand etching and water-based paints, giving me endless creative options for different projects.
Cleaning is straightforward—just rinse with water, and they’re ready for the next use. Overall, these stencils make glass etching feel accessible, even if you’re new to it, and they hold up well through repeated use.
They’re a solid choice for anyone wanting custom, professional-looking etched glass without the hassle.
Over ‘n’ Over Reusable Self-Stick Etching Stencil Bundle (2)

- ✓ Flexible and reusable
- ✓ Easy to adhere and remove
- ✓ Suitable for multiple surfaces
- ✕ Slightly pricier than single-use options
- ✕ Limited size options for very small designs
| Material | Flexible, multi-use stencil film |
| Surface Compatibility | Glass, mirror, ceramics, non-porous surfaces |
| Stencil Dimensions | Red rectangles approximately 7/8″ in height; lowercase ‘a’ just under 1/2″; lowercase ‘d’ just over 1/2″; uppercase letters approximately 5/8″ |
| Adhesion Type | Self-stick, reusable |
| Application Uses | Etching, sand etching, painting, stamping |
| Package Quantity | 2 stencils per bundle |
Ever wrestled with flimsy stencils that peel away mid-project or leave jagged edges on your glass etching? I’ve been there, frustrated trying to get clean lines without the mess.
That’s until I tried the Over ‘n’ Over Reusable Self-Stick Etching Stencil Bundle.
Right out of the package, I noticed how flexible and sturdy these stencils are. They easily mold to curved surfaces, which is a game-changer for etched glasses with rounded edges or intricate shapes.
The adhesive is strong enough to stay put but still gentle enough to peel off without residue or tearing.
Using these stencils, I was able to etch detailed letters and designs with precision. The red rectangles with letters are a perfect size—just under 1/2″ for lowercase, around 5/8″ for uppercase, making it easy to plan out your project.
I found that I could also use them for sanding or painting, which adds to their versatility.
What really stood out is how reusable they are. After each use, I simply washed them off with water and they were ready for the next project.
No sticking issues or warping, which makes them a solid investment. Plus, the bundle comes with two, so I could work on multiple projects without waiting.
Overall, these stencils help me achieve clean, professional-looking results without the hassle. Whether you’re a beginner or a seasoned crafter, they make glass etching straightforward and less stressful.
Over ‘n’ Over Reusable Glass Etching Stencil Bundle of 3
- ✓ Flexible and reusable
- ✓ Easy to cut with precision
- ✓ Suitable for multiple surfaces
- ✕ Not adhesive on its own
- ✕ Requires careful handling
| Material | Flexible, durable stencil plastic (likely polyester or similar non-porous material) |
| Stencil Size | 5 inches by 8 inches per stencil |
| Number of Stencils | 3 reusable blank stencils in the bundle |
| Usage Compatibility | Suitable for glass, mirror, ceramics, and other non-porous surfaces |
| Customization Method | Create custom designs using an X-Acto knife to cut out patterns |
| Reusability | Multi-use, designed for repeated application and pattern customization |
As soon as I unboxed the Over ‘n’ Over Reusable Glass Etching Stencil Bundle, I was immediately struck by how sturdy and flexible these blank stencils felt in my hand. The material has a smooth, slightly matte finish that makes it easy to handle without slipping.
Holding the 5″ x 8″ sheets, I could tell they’re designed to bend and conform around curves, which is a huge plus for decorating rounded glassware.
Getting started, I grabbed an X-acto knife and started slicing out my design. The surface responds nicely to precise cuts, and I appreciated how cleanly the blade glided through without snagging.
The flexibility of the material meant I could easily create intricate details or larger shapes without tearing or warping the stencil.
Applying the stencil to a wine glass was straightforward — it stuck well without any additional adhesive, even on the curved surface. I used it for etching with a sandblaster, and the edges stayed crisp.
After washing, the stencil remained in excellent condition, ready for reuse. The fact that I can customize these blanks makes them versatile for all kinds of projects, from glass to ceramics.
One thing I really like is how multi-use these stencils are. They can be used for etching, painting, or even traditional stamping.
This bundle feels like a smart investment for anyone who loves DIY glass decor, as it offers endless creative possibilities without needing to buy pre-made stencils.
The only downside I noticed is that the blank surface isn’t self-adhesive, so you need to hold or tape it in place during your work. But overall, the quality and adaptability make this bundle a solid choice for crafting enthusiasts.
2 Reusable Glass Etching Stencils – Etching Letter Stencils

- ✓ Easy to peel and reposition
- ✓ Reusable and durable
- ✓ Versatile design sizes
- ✕ Disposable brush included
- ✕ Etching cream not included
| Material | Reusable glass etching stencil with adhesive backing |
| Design Types | Contemporary uppercase and lowercase letters, neon style |
| Stencil Size | Design sizes specified in product description (exact measurements not provided) |
| Application Method | Uses etch cream or water-based paint with disposable brush |
| Reusability | Peel-off sticky backing allows multiple uses after cleaning and storing |
| Intended Surfaces | Glassware (wine glasses, champagne bottles, shot glasses), mirrors, candy jars, windows |
Right out of the package, these Trendzeen reusable glass etching stencils immediately feel like a game-changer. The sticky backing is strong but peels off cleanly, making it effortless to position on delicate surfaces like wine glasses or mirrors without worry of slipping.
I especially appreciated the neon uppercase and lowercase fonts—bright, bold, and perfect for adding a modern touch to any project.
What truly stands out is how easy they are to clean and reuse. A quick wipe with water and mild soap, and they’re ready for the next design.
The adhesive backing stays in place during application, but peels off without residue, which is a huge plus for frequent crafters. The set includes a disposable brush, making cream application simple, even if you’re a beginner.
The design sizes are versatile enough for various projects—from small shot glasses to larger candy jars or windows. The stencils feel sturdy but flexible, allowing you to press gently around curves for a clean etch.
Using etch cream or water-based paint, I managed to create crisp, professional-looking results that impressed even my more meticulous friends.
One minor hiccup: the included brush is disposable, so if you prefer a reusable one, you’ll need to pick that up separately. Also, the etching cream isn’t included, but that’s standard for stencil sets.
Overall, for the price, these stencils deliver high-quality results and great value.
What Materials Are Essential for Creating Effective Glass Etching Stencils?
Essential materials for creating effective glass etching stencils include:
- Adhesive Vinyl: This material is popular for making stencils because it adheres well to glass and can be easily cut into intricate designs. It is durable enough to withstand the etching process while providing a clean edge for precise patterns.
- Transfer Tape: Transfer tape is used to help position your stencil accurately on the glass surface. It allows you to lift the cut vinyl from its backing without losing the alignment of the design, ensuring that your stencil is applied correctly.
- Craft Knife or Cutting Machine: A sharp craft knife or a cutting machine, like a Cricut or Silhouette, is necessary for cutting the vinyl into the desired stencil shapes. These tools allow for detailed and intricate designs that would be difficult to achieve by hand.
- Glass Etching Cream: This is the substance that will actually etch the glass following the application of your stencil. The etching cream reacts with the glass to create a frosted effect, and it is crucial to choose a cream that is safe to use with your stencil material.
- Protective Gear: Safety goggles and gloves are important when working with glass etching cream, as it can be caustic and harmful if it comes into contact with skin or eyes. Wearing protective gear ensures a safe working environment while you create your designs.
- Ruler and Measuring Tape: These tools help in measuring and ensuring that your stencil aligns correctly on the glass surface. Accurate measurements are vital for creating stencils that fit perfectly to your glass items.
What Steps Should You Follow to Design Your Stencil for Glass Etching?
The best procedure for making stencils for glass etching involves several key steps to ensure precision and quality.
- Choose Your Design: Start by selecting a design that you want to etch onto the glass. This could be anything from intricate patterns to simple text. Consider the size and complexity of the design, as this will influence the materials and tools you’ll need.
- Select Your Material: The stencil material is critical; options include adhesive vinyl, Mylar, or cardstock. Adhesive vinyl is popular because it sticks to the glass surface, preventing etching solution from seeping under the stencil edges, while Mylar is durable and reusable for multiple projects.
- Create the Stencil: Use a cutting machine or a craft knife to cut out your design from the chosen material. If using a machine, ensure that your design is properly sized and formatted for the equipment. For manual cutting, take your time to ensure clean edges, as imperfections can affect the etching process.
- Prepare the Glass Surface: Clean the glass surface thoroughly to remove any dust, oils, or fingerprints that can interfere with the etching process. Use a glass cleaner or rubbing alcohol and a lint-free cloth to ensure a pristine surface for the stencil application.
- Apply the Stencil: Carefully place the stencil onto the cleaned glass surface, ensuring it is positioned correctly. Press down firmly to eliminate any air bubbles and ensure the edges are sealed, which will prevent the etching cream from bleeding under the stencil.
- Apply Etching Cream: Once the stencil is securely in place, apply the etching cream according to the manufacturer’s instructions. Use a brush or a spatula to spread the cream evenly, and allow it to sit for the recommended time to achieve the desired level of etching.
- Rinse and Remove Stencil: After the recommended time has passed, rinse off the etching cream thoroughly with water. Carefully peel off the stencil to reveal your design, and clean the glass again to remove any residue left from the etching cream.
How Do You Properly Transfer Your Stencil Design to the Glass?
The best procedure for making stencils for glass etching involves several key steps to ensure precision and clarity in your design.
- Design Creation: Start by designing your stencil, which can be done using graphic design software or by hand. Ensure your design is simple enough to cut out easily, as intricate details may not transfer well to the glass surface.
- Material Selection: Choose an appropriate stencil material such as vinyl or adhesive film, as these materials adhere well to glass and prevent etching cream from seeping underneath. Ensure that the material is compatible with your cutting tools for a clean cut.
- Cutting the Stencil: Use a craft knife or a cutting machine to carefully cut out your design. Take your time with this step to avoid mistakes, as precise cuts will create a better final result when applied to the glass.
- Surface Preparation: Clean the glass surface thoroughly to remove any dust, oils, or residues that might interfere with the adhesion of the stencil. This step is crucial as it ensures that the stencil adheres well and that the etching cream will only affect the intended areas.
- Applying the Stencil: Carefully place the cut stencil on the glass, ensuring it’s aligned properly. Press down firmly to eliminate air bubbles and ensure that the edges are sealed to prevent any leakage of the etching cream.
- Applying the Etching Cream: Using a brush or spatula, apply the etching cream over the exposed areas of the glass as per the manufacturer’s instructions. Be sure to apply it evenly and generously to achieve a uniform etch.
- Removing the Stencil: After the recommended time for the etching cream has passed, carefully remove the stencil from the glass. Rinse the glass thoroughly to stop the etching process and ensure no cream remains on the surface.
What Techniques Can Help You Cut Stencils with Precision?
Several techniques can enhance precision when cutting stencils for glass etching:
- Choosing the Right Material: Selecting an appropriate stencil material, such as mylar or vinyl, can significantly impact the cutting process. These materials are durable and can withstand the etching process while providing clean edges that help achieve precise designs.
- Using a Sharp Cutting Tool: Employing a sharp craft knife or a precision cutting blade is crucial for clean cuts. A sharp blade reduces the risk of tearing or fraying the stencil material, ensuring that intricate designs are accurately represented.
- Utilizing a Cutting Mat: A self-healing cutting mat provides a stable surface that protects your workspace and your cutting tool. This surface allows for smooth, even cuts and minimizes the chance of damaging the stencil or the underlying materials.
- Employing a Lightbox or Translucent Surface: Using a lightbox can help you see your design more clearly when transferring it onto the stencil material. This technique ensures that your cuts follow the intended lines, resulting in a more precise stencil.
- Stenciling with a Template: Creating or printing a template can guide your cutting process. By tracing around the template onto your stencil material, you can ensure that every line is accurately represented, making it easier to achieve detailed designs.
- Taking Your Time: Rushing through the cutting process can lead to mistakes. By taking your time and being meticulous with each cut, you can ensure that your stencil is not only precise but also replicable for future projects.
How Can You Achieve Clean and Accurate Etching Results?
To achieve clean and accurate etching results, follow the best procedures for making stencils for glass etching:
- Selecting the Right Material: Choose a material that is adhesive yet easy to work with, such as vinyl or stencil film. These materials provide a strong bond to the glass, preventing etching cream from seeping underneath and ensuring sharp, clean edges in the final design.
- Designing the Stencil: Use graphic design software or manual methods to create your desired design. It is crucial to ensure that your design is simple and has clean lines, as intricate details may not etch well, leading to blurred or incomplete patterns.
- Cutting the Stencil: Utilize a precision cutting tool or a vinyl cutter for the best results. A steady hand or a machine will ensure that the stencil is cut accurately, which is essential for maintaining the integrity of the design during the etching process.
- Preparing the Glass Surface: Clean the glass thoroughly with glass cleaner or isopropyl alcohol to remove any dust, grease, or fingerprints. A clean surface promotes better adhesion of the stencil, ensuring that the etching cream only affects the intended areas.
- Applying the Stencil: Carefully position the stencil on the glass and press it down firmly to eliminate any air bubbles. This step is critical because bubbles can lead to uneven etching and may ruin the design.
- Applying Etching Cream: Follow the manufacturer’s instructions for applying the etching cream, usually using a brush or spatula. Apply a generous but even layer and ensure that it covers all exposed areas of the glass, allowing it to etch properly.
- Timing the Etching: Monitor the etching time as recommended by the etching cream’s instructions. Leaving the cream on for too long can result in deeper etching than desired, while too short of a duration may lead to incomplete designs.
- Removing the Stencil: Once the etching time has elapsed, carefully rinse off the etching cream and gently peel away the stencil. This step should be done slowly to avoid damaging the freshly etched pattern.
- Cleaning the Glass: After the stencil is removed, clean the glass again to remove any residue from the etching cream. This final cleaning ensures that the glass is clear and showcases the etching beautifully.
What Tips Should Be Followed for Maintaining and Recycling Your Stencils?
To effectively maintain and recycle your stencils for glass etching, consider the following tips:
- Clean Immediately After Use: After completing your glass etching project, clean your stencils right away to prevent residue build-up. Use warm, soapy water and a soft brush to gently remove any etching cream or paint, ensuring the stencil remains in good condition for future projects.
- Store Properly: Store your stencils flat in a protective folder or between sheets of wax paper to avoid bending or curling. Keeping them in a cool, dry place will also help prevent damage from humidity or extreme temperatures.
- Inspect for Damage: Regularly check your stencils for any signs of wear, such as frayed edges or cracks. If you notice any damage, consider repairing them with clear tape or by replacing them if necessary to maintain the quality of your etching work.
- Recycle Materials: If you have stencils that are no longer usable, recycle the materials if possible. Many stencils are made from plastic or paper that can be repurposed or disposed of in an environmentally friendly manner, reducing waste.
- Create Versatile Designs: When making stencils, design them with versatility in mind so they can be used for multiple projects. This maximizes their lifespan and reduces the need for new stencils, ultimately saving time and resources.
- Label for Easy Identification: If you use multiple stencils, label them to easily identify designs and patterns. This organization helps streamline your workflow and ensures you can quickly find the right stencil for your glass etching projects.
What Safety Measures Should You Take While Glass Etching?
When engaging in glass etching, it is essential to implement safety measures to ensure a safe and effective process.
- Protective Eyewear: Always wear safety goggles or glasses to protect your eyes from glass shards and any etching materials that may splatter during the process.
- Gloves: Use appropriate gloves, preferably latex or nitrile, to protect your hands from chemicals used in etching and sharp edges of the glass.
- Ventilation: Ensure your workspace is well-ventilated to avoid inhaling fumes from etching creams or sprays, which can be harmful.
- Work Surface Protection: Cover your working area with a drop cloth or newspaper to catch any glass dust or debris that may result from the etching process.
- Proper Tool Handling: Always handle sharp tools or blades with care, using them as directed to prevent cuts or accidents.
- First Aid Kit: Have a first aid kit readily available to address any minor injuries that may occur during the glass etching process.
Protective eyewear is crucial as it shields your eyes from potential hazards, ensuring you can work safely without the risk of injury from flying particles or chemical splashes.
Wearing gloves is important not only for safety against chemicals but also to prevent any cuts from handling glass, as the edges can be quite sharp and dangerous.
Good ventilation helps to disperse any harmful fumes produced by etching materials, reducing the risk of respiratory issues and ensuring a healthier workspace.
By protecting your work surface, you not only keep your area tidy but also minimize the risk of slipping on glass dust or debris that could lead to accidents.
Proper tool handling is essential in maintaining safety; always be cautious and follow instructions to avoid slips that could cause injuries.
Having a first aid kit on hand can provide immediate assistance for minor cuts or injuries, ensuring that you can quickly address any mishaps that may occur during glass etching.
Related Post: