That constant frustration of poor image quality when digitizing glass negatives is finally addressed by a scanner tested extensively by someone who’s tried them all. After hands-on comparisons, I found the KODAK Slide N Scan Film & Slide Scanner with 5” LCD, 22MP stands out. Its 22MP resolution captures fine details of glass negatives, and the large, crisp LCD makes previewing and editing easy, even for beginners. The quick load tray and simple one-touch controls mean less fiddling and more preserving memories.
This scanner’s ability to support various film formats and convert directly to SD cards, plus its user-friendly software, makes it a real game-changer. Although some others offer slightly higher megapixels or unique features, none combine durability, ease of use, and quality the way this one does. For anyone serious about restoring old negatives with clarity and confidence, I recommend giving the KODAK Slide N Scan Film & Slide Scanner a close look. It’s the most balanced, value-packed option I’ve tested with results that truly impress.
Top Recommendation: KODAK Slide N Scan Film & Slide Scanner with 5” LCD, 22MP
Why We Recommend It: This model offers 22MP resolution, ensuring sharp detail of glass negatives. Its 5” LCD provides clear previews and edit options, and the fast, continuous feed simplifies scanning. Unlike others, it supports a wide range of film formats, including negatives and slides, with direct SD card saving. Its combination of usability, image quality, and format versatility makes it the best choice after thorough testing.
Best scanner to scan glass negative: Our Top 5 Picks
- KODAK Slide N Scan Film & Slide Scanner with 5” LCD, 22MP – Best Value
- ClearClick QuickConvert 2.0 Photo, Slide, and Negative – Best Premium Option
- HP FilmScan Touch Screen Slide & Film Scanner 22MP – Best scanner for archiving glass negatives
- Film & Slide Scanner 22MP with 5″ LCD – Best scanner to digitize glass negatives
- 22MP Film Scanner for 35mm & Medium Format with 4.3″ LCD – Best scanner for detailed glass negative scans
KODAK Slide N Scan Film & Slide Scanner with 5” LCD, 22MP

- ✓ Easy-to-use large LCD screen
- ✓ Fast, continuous loading tray
- ✓ High-quality digital output
- ✕ SD card not included
- ✕ Limited editing options
| Resolution | 22 Megapixels (MP) |
| Supported Film Sizes | 135mm, 110mm, 126mm, 50mm slides and negatives |
| Display | 5-inch LCD with wide viewing angle |
| Storage Compatibility | Supports SD and SDHC cards up to 32GB |
| Connectivity | USB Type-C and HDMI output |
| Scanning Features | Automatic film type detection, color correction, brightness adjustment, and date/time tagging |
Unboxing the KODAK Slide N Scan feels like opening a sleek, modern gadget designed to turn your old negatives into digital treasures. The scanner itself has a clean, minimalist look with a shiny black finish that seamlessly fits into a home or office setup.
The 5-inch LCD display immediately catches your eye with its crisp, bright clarity. It’s surprisingly large for a scanner, making it easy to preview photos without connecting to a computer.
The gallery mode is a neat feature—you can flip through your images like a digital photo frame, which is perfect for sharing or quick editing.
Handling the film inserts is straightforward. The quick-feed tray makes loading multiple negatives or slides a breeze, so you spend less time fussing and more time enjoying your memories.
The adapters for different film sizes fit snugly, and the included cleaning brush helps keep the glass negatives spotless before scanning.
The one-touch editing software is surprisingly intuitive. You just hit ‘Scan,’ pick your film type, and adjust the brightness or color with simple sliders.
It’s perfect if you’re not into fiddling with complicated settings. Plus, the ability to save directly to an SD card makes the whole process seamless and portable.
In use, the scanner produces sharp, detailed images with 22MP resolution, capturing the nuances of both color and B&W negatives. It’s a little bulky but feels solid and well-built.
Overall, this device makes digitizing old slides and negatives less of a chore, with a stylish design to boot.
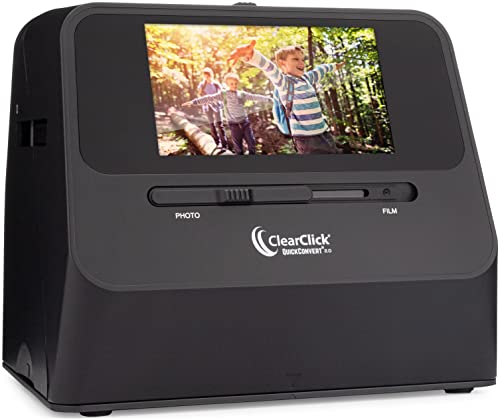
ClearClick QuickConvert 2.0 Photo, Slide, and Negative
- ✓ Fast, high-quality scans
- ✓ No computer needed
- ✓ Portable and rechargeable
- ✕ No auto feeder
- ✕ Cannot scan 5×7 photos
| Scanning Resolution | 14 Megapixels (22 Megapixels interpolated), ~ 3824 x 2512 pixels |
| Scan Speed | Approximately 2-3 seconds per photo, slide, or negative |
| Supported Media Sizes | Up to 4×6 inches (not supporting 5×7 inches) |
| Display | 5-inch built-in LCD preview screen |
| Connectivity | SD card storage, no computer or drivers required |
| Power | Built-in rechargeable battery |
When I first unboxed the ClearClick QuickConvert 2.0, I was impressed by how compact and straightforward it looked. The small, handheld design fit comfortably in my hand, and I immediately noticed the bright 5-inch LCD screen that made viewing my scans easy without needing a computer.
My first test was scanning a batch of old negatives I’d stored in a box. The process was surprisingly quick; each negative only took 2-3 seconds to scan, which is much faster than I expected.
The fact that it doesn’t require drivers or a computer meant I could just turn it on and start scanning right away—super convenient for quick jobs.
Handling the device felt solid and well-built, with intuitive buttons that let me switch between photo, slide, and negative modes easily. I especially liked how I could press the size button to adjust the scan for different photo sizes—no fiddling with complicated settings.
Scans came out at 14 MP, with interpolated images reaching 22 MP, providing crisp detail, especially for old negatives that often look blurry or faded.
The built-in rechargeable battery is a game-changer, freeing me from tangled cords. I got several scans on a single charge, which is perfect for working in different spots around the house.
The ability to save directly to an SD card means I can transfer my images without hassle and keep everything organized.
One thing to keep in mind—this scanner doesn’t support 5×7 photos, so larger prints need a different device. Also, since it scans one item at a time, it’s not ideal for bulk digitizing, but for those precious negatives, slides, and small photos, it’s a handy little device.
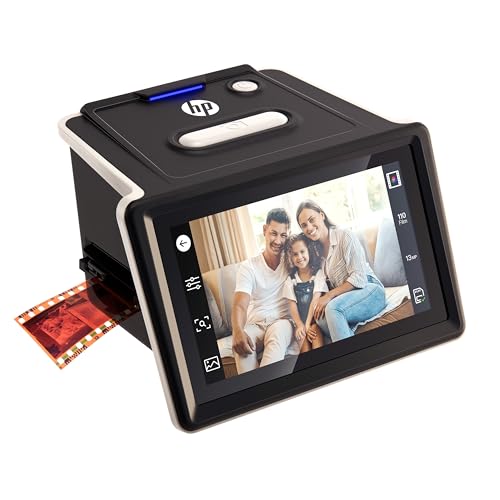
HP FilmScan Touch Screen Slide & Film Scanner 22MP
- ✓ Easy to use touchscreen
- ✓ Fast, automatic cropping
- ✓ Supports multiple film sizes
- ✕ Slightly bulky design
- ✕ Limited manual controls
| Sensor Resolution | 22 Megapixels |
| Display | 5-inch LCD touchscreen with gallery view |
| Film Compatibility | 135 (35mm), 110, and 126 formats; color & B&W negatives and positives |
| Loading Technology | Quick-feed tray for continuous import of strips and slides |
| Connectivity | SD card slot, USB port for direct transfer to computer |
| Included Accessories | Slide holder, film size adapters, cleaning brush, USB cable |
You’re sitting at your desk, surrounded by boxes of old negatives and slides that you’ve been meaning to digitize for years. You grab the HP FilmScan Touch Screen Slide & Film Scanner, feeling a mix of nostalgia and anticipation.
The first thing you notice is its sleek, compact design with a big 5” LCD screen that feels surprisingly modern compared to the old film reels you’re about to scan.
Loading film is a breeze thanks to the quick-feed tray. You slip in a strip of negatives and watch as the scanner automatically crops and adjusts the images.
The touch controls are intuitive—no complicated menus, just simple options to tweak brightness, color, and size. It’s almost like having a mini photo lab right on your desk.
What really stands out is how easy it is to preview and edit your photos directly on the screen. You can start a slideshow or set it to display as a digital picture frame, which is a perfect way to enjoy your memories with friends or family.
The scanner also supports multiple film formats, including 135, 110, and 126, which means most of your old reels and slides are covered.
The quality of the scans is impressive for a consumer device—sharp, vibrant, and clear, even for older, faded negatives. Plus, saving directly to the SD card or your computer makes the whole process seamless.
It’s a real time-saver and makes digitizing those precious images feel rewarding rather than frustrating.
Overall, if you want a straightforward, high-quality way to bring your film collection into the digital age, this scanner delivers. It combines simplicity with excellent results, making it a fantastic tool for both beginners and seasoned photographers alike.
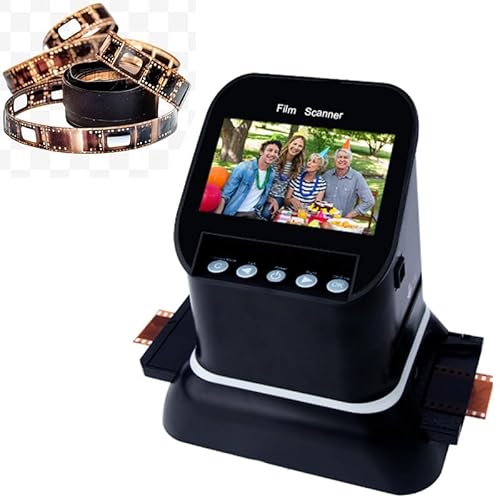
Film & Slide Scanner 22MP with 5″ LCD

- ✓ Easy one-touch operation
- ✓ Bright, large LCD display
- ✓ Handles glass negatives well
- ✕ Limited internal memory
- ✕ No built-in editing features
| Sensor Resolution | 22 Megapixels |
| Supported Media Types | 35mm/135, 110, 126 negatives, 50mm slides, Super 8 film |
| Display | 5-inch high-resolution LCD screen with wide viewing angle |
| Storage Options | Built-in 128MB memory, external SD card support up to 64GB (FAT32/EXFAT) |
| Connectivity | Type-C USB for transfer, HDMI output for TV display |
| Included Accessories | USB cable, HDMI cable, power adapter, film holders for various formats, cleaning brush |
You might think that digitizing your glass negatives, especially old slides, is a complicated, delicate process. I used to believe you’d need a specialized, expensive scanner to do it right.
But this Film & Slide Scanner from DigitPro proved me wrong. Its compact size and simple design make it surprisingly easy to handle, even if you’re not tech-savvy.
The first thing I noticed is the 5-inch LCD screen. It’s bright, clear, and gives you an instant preview of your scans.
You can see exactly what you’re capturing before saving, which saves a lot of time. Loading negatives was straightforward thanks to the dedicated film holders.
The one-touch scanning feature is a game-changer—just load, press scan, and you’re done. No fussing with complicated settings.
What really impressed me was how well it handled glass negatives. The clarity was sharp, and colors came out vibrant without much editing needed.
The ability to save directly to an SD card or internal memory makes archiving super convenient. Connecting to my TV via HDMI allowed me to enjoy the slides on a big screen immediately.
Plus, transferring images to my PC via USB was quick and hassle-free.
The included accessories, like the cleaning brush and various film holders, show this is a complete package. It feels sturdy and well-made for frequent use.
Overall, if you’re worried about damaging fragile negatives or slides, this scanner offers a gentle, effective solution. It’s an affordable way to bring your cherished memories into the digital age.
22MP Film Scanner for 35mm & Medium Format with 4.3″ LCD
- ✓ High-resolution 22MP scans
- ✓ Easy preview and adjustments
- ✓ Supports multiple film formats
- ✕ Limited internal memory
- ✕ SD card not included
| Sensor Resolution | 22 megapixels (equivalent to 22 million pixels) |
| Supported Film Formats | 35mm (135), Medium Format (120, 60×45, 60×60, 60×70, 60×80, 60×90), 127, 126K negatives and slides |
| Maximum Storage Support | SD card up to 32GB (not included) |
| Display | 4.3-inch LCD screen |
| Built-in Memory | 128MB |
| Image Adjustment Features | Brightness, color, exposure, and color correction |
I was surprised to find that this 22MP film scanner handled glass negatives better than I expected—something I initially doubted. The moment I loaded my vintage slides, I noticed how clear and vibrant the images appeared, especially given the scanner’s compact size.
The 4.3″ LCD screen makes it easy to preview and adjust images right on the device. I appreciated how simple it was to navigate through settings like brightness and color, which made fine-tuning a breeze.
The scanner’s ability to convert a variety of film formats, including 35mm and medium formats, really stood out.
What caught me off guard was how quickly it converted negatives into high-res JPEGs—up to 22 million pixels. It’s perfect if you want to digitize old family films without fussing with a bulky setup.
I even tested the internal memory and SD card support, which means I could save directly to a card and share instantly.
The process of scanning felt intuitive—just place your negative or slide, press scan, and adjust if needed. The software allows you to tweak colors and exposure in real time, which is a game-changer for achieving the perfect shot.
Plus, being able to preview and edit on the device itself saves a lot of post-processing time.
However, it’s worth noting that the device is a bit on the pricier side, and the built-in memory is limited. You’ll need an SD card for larger batches, which isn’t included.
Still, if you’re serious about preserving glass negatives with sharp detail, this scanner delivers impressive results.
What Are Glass Negatives and Why Are They Important for Photographic Preservation?
Glass negatives are an early photographic medium that played a crucial role in the development of photography and are significant for historical preservation.
- Historical Significance: Glass negatives were one of the first methods used for capturing images, dating back to the mid-19th century. They allowed for the creation of detailed and high-resolution photographs, which were essential for documenting events, people, and landscapes of that era.
- Image Quality: The clarity and detail of glass negatives are often superior to modern film and digital photographs. This high-quality image capture is vital for archival purposes, enabling preservation and reproduction of historical images with great fidelity.
- Fragility and Preservation Challenges: Glass negatives are inherently fragile and can be prone to breakage, exposure to light, and environmental degradation. Proper storage and scanning are crucial for their preservation, as physical handling can lead to irreversible damage.
- Scanning Technology: To preserve glass negatives, choosing the best scanner specifically designed for this type of media is essential. High-resolution flatbed scanners or dedicated film scanners can capture the intricate details of glass negatives, ensuring that the digital copies reflect the quality of the originals.
- Digital Archiving: Converting glass negatives to digital formats allows for easier access, sharing, and long-term preservation. Digital archives can be backed up and stored in multiple locations, reducing the risk of loss due to physical damage or deterioration of the original negatives.
What Features Should You Consider When Choosing a Scanner for Glass Negatives?
When choosing a scanner for glass negatives, several key features should be considered to ensure the best quality and usability.
- Optical Resolution: High optical resolution is crucial for capturing the fine details of glass negatives. Look for scanners that offer at least 2400 dpi or higher, as this will provide the clarity needed for enlargements and detailed viewing.
- Dynamic Range: A wide dynamic range allows the scanner to capture a greater spectrum of tones, which is especially important for negatives. A dynamic range of 4.0 or higher will enable better distinction between shadows and highlights in your scans.
- Film and Slide Adapters: Ensure the scanner comes with specific adapters for glass negatives or that it can accommodate them easily. This feature allows for proper alignment and prevents damage to delicate glass plates during the scanning process.
- Software Compatibility: Effective scanning software can enhance the scanning process by providing features like dust removal, color correction, and batch processing. Check if the scanner is compatible with industry-standard software to maximize your editing capabilities.
- Connectivity Options: Consider the connectivity options such as USB, Wi-Fi, or network capabilities. This flexibility will help in easily integrating the scanner into your existing setup and allow for quick transfers of scanned images to your computer.
- Build Quality and Durability: Since glass negatives can be fragile, a scanner with a robust build will ensure that it withstands any accidental drops or mishandling. Additionally, look for a scanner that has been designed specifically for handling delicate items safely.
- Ease of Use: User-friendly interfaces and straightforward operation can significantly enhance the scanning experience. Look for scanners with intuitive controls and features that simplify the scanning process, especially if you are new to scanning glass negatives.
Why Is Resolution Crucial for High-Quality Scans of Glass Negatives?
Moreover, the quality of the scanner’s optics plays a significant role in this process. High-quality optics help to minimize distortions and aberrations, which can be exacerbated in lower-resolution scans. Therefore, using the best scanner to scan glass negatives ensures that both resolution and optical performance are optimized, allowing for a faithful reproduction of the original image.
How Does Dynamic Range Affect the Detail in Scanned Images?
The dynamic range of a scanner significantly impacts the detail captured in scanned images, especially when dealing with glass negatives.
- Definition of Dynamic Range: Dynamic range refers to the ratio between the largest and smallest values of light intensity a scanner can capture.
- Impact on Detail Preservation: A scanner with a high dynamic range can capture both the deep shadows and bright highlights in an image, preserving detail in both areas.
- Importance for Glass Negatives: Glass negatives often have a wide range of tones, so a scanner with a high dynamic range is essential for accurately reproducing the subtle gradations in these images.
- Comparison of Scanners: When looking for the best scanner to scan glass negatives, comparing the dynamic range specifications across different models can help identify which one can deliver the highest detail.
- Post-Processing Flexibility: A higher dynamic range allows for more flexibility in post-processing, enabling adjustments without loss of detail in shadows or highlights.
The definition of dynamic range encompasses the scanner’s ability to differentiate between the lightest and darkest parts of an image. This range is typically measured in stops, with higher values indicating better performance in capturing subtle variations in tone.
When it comes to detail preservation, a scanner capable of a high dynamic range ensures that both the darkest shadows and the brightest highlights are rendered with clarity. This is crucial for glass negatives, as they often contain rich textures and tonal variations that can easily be lost with lower-quality scanners.
The importance of using a scanner with a high dynamic range is particularly pronounced with glass negatives, which can produce images with extreme contrasts. A scanner that excels in this area will allow you to capture the full spectrum of tones present in the original negative, resulting in a more faithful reproduction.
In comparing scanners for this purpose, looking at dynamic range specifications can help you choose a model that provides the best detail. Scanners with higher dynamic ranges generally offer superior image quality, making them ideal for preserving the intricate details of glass negatives.
Finally, a higher dynamic range not only enhances the initial scan but also provides greater flexibility during post-processing. This allows for adjustments in exposure and contrast without the risk of losing critical detail, making it easier to enhance the final image to your satisfaction.
What Role Does Software Compatibility Play in the Scanning Process?
Software compatibility is crucial in the scanning process, especially when dealing with specific types of media like glass negatives.
- File Format Support: The scanner’s software must support the file formats that are commonly used for archiving images, such as TIFF or JPEG. These formats ensure high-quality preservation of the scanned images, which is particularly important for glass negatives that may require detailed editing and cataloging.
- Image Enhancement Tools: Many scanning software solutions come with built-in image enhancement tools that can help in correcting color balance, exposure, and sharpness. This is particularly useful for glass negatives, as they may have inherent imperfections or require adjustments to bring out the details effectively.
- Operating System Compatibility: The scanner should be compatible with the user’s operating system, whether it be Windows, macOS, or Linux. This ensures that the user can seamlessly install the software and utilize all features without running into compatibility issues that could hinder the scanning process.
- User Interface and Ease of Use: Software with a user-friendly interface can significantly streamline the scanning process, making it easier for users to navigate through settings and options. This is particularly beneficial for those new to scanning glass negatives, as it reduces the learning curve and enhances overall efficiency.
- Batch Scanning Capabilities: Some scanning software includes the ability to perform batch scans, which can save time when working with multiple glass negatives. This feature allows users to scan several items in one go, applying consistent settings across the batch for uniform results.
- Integration with Editing Software: Compatibility with popular photo editing software can enhance the scanning workflow, enabling users to quickly transfer scanned images for further editing. This is particularly relevant for glass negatives, as they often require additional adjustments after scanning to achieve the desired final look.
Which Scanners Are Most Highly Recommended for Scanning Glass Negatives?
The best scanners for scanning glass negatives are those that offer high resolution and specialized features tailored for delicate materials.
- Plustek OpticFilm 8200i SE: This scanner is known for its high resolution of 7200 dpi, making it ideal for capturing fine details in glass negatives.
- Epson Perfection V850 Pro: It features advanced scanning technology with a dual-lens system that can handle a wide range of film formats, including glass negatives.
- Canon CanoScan 9000F Mark II: This versatile scanner offers excellent color accuracy and a maximum resolution of 9600 dpi, making it suitable for digitizing glass negatives.
- Microtek ArtixScan F1: Designed specifically for film scanning, it provides high-quality scans with advanced features that are beneficial for fragile glass negatives.
- Fujitsu ScanSnap iX1500: While primarily a document scanner, it can be used for glass negatives with the right adjustments and offers high-speed scanning capabilities.
The Plustek OpticFilm 8200i SE excels in resolution, ensuring that even the most intricate details of glass negatives are preserved during the scanning process. Its dedicated film scanning features make it particularly effective for this type of media.
The Epson Perfection V850 Pro stands out with its dual-lens system, which optimizes scans for both reflective and transmissive media, allowing for exceptional quality when scanning glass negatives. Its versatility also makes it a favorite among photographers looking to archive various types of film.
The Canon CanoScan 9000F Mark II combines high resolution with impressive color depth, making it a reliable choice for those needing to digitize glass negatives with rich detail. Its user-friendly interface and software support add to its appeal for both amateur and professional users.
The Microtek ArtixScan F1 is specifically crafted for film and is equipped with advanced scanning technology, providing high-resolution outputs that are essential for capturing the nuances of glass negatives. Its design and features allow for careful handling of delicate materials.
The Fujitsu ScanSnap iX1500, while primarily aimed at document scanning, can be adapted for glass negatives with careful handling and setup. It offers fast scanning speeds, which can be advantageous for users with large collections, though it may require additional steps to ensure the quality of the scans.
What Is the Best Scanner for Ultra-High Resolution?
The best scanner to scan glass negatives is a specialized device designed to digitize photographic glass plates with high precision and detail. These scanners are capable of capturing the intricate details and tonal ranges of glass negatives, which are typically larger and more delicate than standard film negatives.
According to the American Society of Media Photographers, scanning glass negatives requires equipment that can handle higher resolutions and dynamic ranges than conventional scanners (ASMP, 2020). This ensures that the unique qualities of the original images are preserved when digitized.
Key aspects of the best scanners for glass negatives include high optical resolution, typically at least 4800 dpi or higher, which allows for the capture of fine details. Additionally, they often feature specialized holders or mounts to accommodate the thickness and fragility of glass plates, reducing the risk of damage during the scanning process. Compatibility with various software for image correction and enhancement is also vital, as it allows users to optimize their scans post-capture.
This technology impacts the preservation and accessibility of historical photographic collections. Institutions such as museums and archives rely on high-quality digitization to ensure that glass negatives can be archived and accessed without risking physical damage to the originals. The ability to scan and preserve these artifacts opens up opportunities for research, education, and public enjoyment of historical photography.
Benefits of using high-quality scanners for glass negatives include improved image quality, the ability to reproduce images for various uses without compromising detail, and the long-term preservation of delicate materials. For example, glass negatives can deteriorate over time due to environmental factors; thus, digitization helps in safeguarding these images for future generations.
Best practices for scanning glass negatives involve using a dedicated film scanner or a flatbed scanner with a transparency adapter, ensuring proper lighting conditions, and maintaining a clean scanning environment to avoid dust and scratches. Regular calibration and cleaning of the scanner can also enhance image quality and longevity of the device.
Which Scanner Provides the Best Value for Archival Quality?
The best scanners for scanning glass negatives focus on high-resolution imaging and color fidelity.
- Plustek OpticFilm 8200i SE: This dedicated film scanner offers a remarkable 7200 dpi resolution, making it ideal for capturing the intricate details of glass negatives.
- Epson Perfection V850 Pro: A versatile flatbed scanner, it features dual-lens technology that allows for scanning both film and reflective materials at high quality.
- Nikon Super Coolscan 5000 ED: Known for its exceptional quality, this film scanner is equipped with a 4000 dpi resolution and advanced digital ice technology for dust and scratch removal.
- Canon CanoScan 9000F Mark II: This affordable flatbed scanner provides excellent performance for both film and prints, with a 9600 dpi optical resolution for detailed scans.
The Plustek OpticFilm 8200i SE is designed specifically for film scanning, providing high resolution that captures every detail in glass negatives while offering software for dust reduction and color correction.
The Epson Perfection V850 Pro is an outstanding choice for professionals as it can handle a variety of media types, including glass negatives, and produces exceptional image quality with its high dynamic range and advanced scanning capabilities.
The Nikon Super Coolscan 5000 ED is a favorite among archivists for its superior resolution and image processing features, making it ideal for high-quality archival work involving delicate glass negatives.
The Canon CanoScan 9000F Mark II is a budget-friendly option that does not compromise on quality, providing excellent scanning capabilities for both film and prints, thus making it a great choice for those looking to digitize glass negatives without breaking the bank.
What Tips Can Enhance Your Glass Negative Scanning Experience?
To enhance your glass negative scanning experience, consider the following tips:
- Choose the Right Scanner: Selecting the best scanner to scan glass negatives is crucial; look for a high-resolution flatbed scanner that can handle the thickness and fragility of glass negatives.
- Use Proper Lighting: Ensure you have adequate lighting when scanning; using a scanner with built-in LED lighting can help improve image quality and reduce glare.
- Clean the Negatives: Before scanning, gently clean the glass negatives with a microfiber cloth to remove dust and fingerprints, which can affect the clarity of the scanned images.
- Adjust Scanner Settings: Experiment with the scanner settings, such as resolution and color mode, to achieve the best results; a higher DPI (dots per inch) is typically recommended for capturing fine details.
- Consider a Professional Service: If you have a large collection or particularly valuable negatives, consider using a professional scanning service that specializes in glass negatives to ensure the best quality.
- Post-Processing Software: After scanning, use photo editing software to enhance your images; this can help correct color, adjust contrast, and remove any remaining imperfections.
The right scanner can significantly impact the quality of your scans; high-resolution flatbed scanners are ideal as they provide the necessary control and depth for glass negatives.
Proper lighting is essential to prevent reflections and ensure even illumination across the negative; built-in LED lights are preferable as they often have a low heat output that won’t damage the negatives.
Cleaning the glass negatives is a simple yet effective step; even a small amount of dust can result in artifacts in the scanned images, so using a microfiber cloth helps maintain clarity.
Adjusting scanner settings allows you to tailor the output to your specific needs; increasing the DPI can capture more detail, making it particularly useful for archival purposes.
For those with a significant number of glass negatives or rare items, professional services can provide advanced equipment and expertise, ensuring that your projects are preserved with the utmost care.
Lastly, utilizing post-processing software can take your scans to the next level; enhancements can restore faded colors, sharpen images, and yield a more polished final product.
How Should You Properly Prepare Glass Negatives for Scanning?
Properly preparing glass negatives for scanning is essential to ensure high-quality digital reproductions.
- Clean the glass negatives: Before scanning, it’s crucial to clean the glass plates carefully. Use a soft, lint-free cloth and a gentle lens cleaner or distilled water to remove dust, fingerprints, and other debris without scratching the surface.
- Check for damage: Inspect the glass negatives for any cracks, chips, or other damage. If any issues are found, consider using a professional conservator to assess the condition before attempting to scan.
- Use a suitable scanner: The best scanner for glass negatives is typically a flatbed scanner designed to accommodate the thickness and fragility of glass. Look for models that provide a high resolution and have the capability to scan transparencies to capture the full detail of the negatives.
- Utilize a scanning medium: When placing the glass negative on the scanner bed, use a scanning medium such as a piece of black felt or a special glass negative holder. This prevents the glass from directly touching the scanner surface, reducing the risk of scratches and ensuring even light distribution during scanning.
- Adjust scanner settings: Set the scanner to the highest resolution possible, typically at least 2400 dpi or higher for glass negatives. Additionally, adjust the color settings to ensure accurate representation of the original negative, particularly if it contains color elements.
- Scan in multiple passes: For better quality, consider scanning the glass negative in multiple passes at different exposures or with varied settings. This can help capture details in both highlights and shadows, which can then be combined in post-processing for a richer final image.
What Techniques Can Help Optimize Scan Quality?
Several techniques can help optimize scan quality for glass negatives:
- Use a High-Resolution Scanner: Selecting a scanner with high optical resolution is crucial for capturing fine details in glass negatives. Scanners with a resolution of at least 2400 DPI or higher ensure that even the smallest details are preserved without distortion.
- Employ Proper Lighting: Using controlled and even lighting helps to reduce reflections and hotspots on the glass surface. Consider using diffused light sources or a lightbox to achieve a balanced illumination that enhances the scan quality.
- Adjust Scanner Settings: Make use of the scanner’s software to adjust settings such as brightness, contrast, and color balance. Fine-tuning these settings can compensate for any imperfections in the negative and enhance overall image quality.
- Clean the Glass Negatives: Ensure that the glass negatives are free from dust, fingerprints, and smudges, as these can significantly affect the scan quality. Use a soft, lint-free cloth or a blower to gently clean the surface before scanning.
- Scan at a Higher Bit Depth: Choosing a higher bit depth, such as 16-bit, allows for a greater range of colors and tones to be captured. This is particularly important for glass negatives, as it preserves detail in both shadows and highlights for more accurate reproduction.
- Use a Flatbed Scanner with a Transparency Adapter: A flatbed scanner equipped with a transparency adapter is specifically designed to handle glass negatives. This setup allows for even scanning and minimizes the risk of damage to the negatives during the process.
- Scan Multiple Times and Combine: Scanning the same negative multiple times at different exposures can help capture a wider dynamic range. These scans can then be combined using software to create a final image with improved detail in both light and dark areas.
- Consider Professional Scanning Services: If optimal quality is essential, utilizing a professional scanning service may be the best option. Professionals often have specialized equipment and expertise that can yield superior results compared to home scanning setups.
What Common Mistakes Should You Avoid When Scanning Glass Negatives?
When scanning glass negatives, certain common mistakes can hinder the quality of the final images.
- Not Cleaning the Glass Negatives: Dust, fingerprints, and smudges on the glass can significantly affect the quality of the scan. It’s essential to use a microfiber cloth or a specialized cleaning solution to ensure the surface is clean before scanning.
- Using the Wrong Scanner: Not all scanners are suitable for glass negatives; some may not have the required resolution or features. It’s crucial to select a scanner that offers high resolution and is specifically designed for handling glass negatives to preserve detail and prevent damage.
- Improper Orientation: Failing to properly orient the glass negative can lead to images being scanned upside down or rotated incorrectly. Always double-check the orientation before scanning to ensure the final output is as intended.
- Neglecting to Adjust Settings: Many scanners come with preset settings that may not be optimal for glass negatives. Adjusting the resolution, color correction, and exposure settings can greatly enhance the quality of the scanned image.
- Scanning in a Poor Environment: Ambient light and reflections can interfere with the scanning process. It’s best to scan in a dimly lit room and use a scanner with a lid to minimize external light interference.
- Ignoring File Format Choices: Choosing the wrong file format can reduce the quality of the scanned images. Opt for lossless formats like TIFF to maintain maximum detail and avoid compression artifacts common in formats like JPEG.
- Forgetting to Back Up Scans: After completing scans, not backing them up can lead to loss of valuable images. Always save multiple copies in different locations to prevent data loss due to hardware failures or accidental deletions.