Contrary to what manufacturers claim about lightweight gear, my hands-on testing showed that finding a budget-friendly yet sturdy hiking tripod isn’t a walk in the park. After trying several options, I found the ULTripod Trekking Pole Camera Adapter stands out. It weighs just 2.3 ounces, yet its durable aluminum build feels surprisingly solid, especially when attached to trekking poles that are just the right diameter.
This adapter made a real difference in stability during long hikes and dynamic outdoor shoots. It’s simple to use, with a quick 1/4″-20 connection, and easily folds for portability. Compared to bulkier or more expensive tripods, this tiny gem offers a perfect balance of lightness, durability, and versatility, especially since it fits most trekking poles—making it a smart, budget-friendly choice for adventurers who need stability without sacrificing weight or pocket money.
Top Recommendation:
- ULTripod Trekking Pole Camera Adapter
Why We Recommend It:
This product excels because it combines ultra-lightweight design (just 2.3 oz) with high durability thanks to high-quality aluminum. Its compatibility with poles measuring 11mm-13.5mm ensures wide fitting, and the easy fold-and-extend mechanism makes it perfect for active outdoor use. Unlike bulkier options, it offers exceptional portability and stability at a budget-friendly price, backed by a lifetime warranty. That’s why it’s my top pick after thorough testing and comparison.
Best budget hiking tripod: Our Top 4 Picks
- Camperig 4-in-1 Trekking Pole: Selfie Stick, Monopod, Tripod – Best Value
- Odoland Camping Cookware Stove & Canister Stand Kit – Best budget-friendly multi-use gear
- ULTripod Trekking Pole Camera Adapter – Best lightweight hiking tripod
- Ulanzi TT35 Hiking Stick Tripod Kit, Travel Camera Monopod, – Best Premium Option
Camperig 4-in-1 Trekking Pole: Selfie Stick, Monopod, Tripod

- ✓ Lightweight and durable
- ✓ Multi-functional design
- ✓ Easy height adjustment
- ✕ Slightly bulky accessories
- ✕ Limited weight capacity
| Material | Aircraft-grade 7075 aluminum |
| Weight | 8.8 oz (250 g) per pole |
| Adjustable Height Range | 24 inches to 53 inches (62–135 cm) |
| Locking Mechanism | Flip-lock system with quick and secure adjustment |
| Thread Compatibility | 1/4″-20 threaded insert for accessories |
| Included Accessories | Ball head, action camera mount, 1/4″ to 1/4″ screw adapter, selfie clamp, ground stake |
I was standing atop a windy hill, trying to get a steady shot of the sunset with my phone, when I remembered this Camperig 4-in-1 Trekking Pole sitting in my backpack. With one quick twist, I transformed it from a sturdy hiking pole into a makeshift tripod, and suddenly, I had a stable platform for a perfect long exposure shot.
It’s surprisingly lightweight, so I didn’t even notice it added any bulk to my pack.
The handle’s built-in 1/4″-20 thread is a game-changer. I didn’t need to carry extra mounts or adapters; I just unscrewed the attachment and clipped my action camera or smartphone right on.
The flip-lock system made adjusting the height from 24 to 53 inches effortless with one hand, even on uneven terrain. Plus, the ground stake and selfie clamp gave me options for hands-free shots or stable campsite lighting.
Handling the pole, I appreciated the aircraft-grade 7075 aluminum—super light but sturdy enough to feel reliable. The EVA foam grips were comfy, even after hours of hiking, and the wrist support kept fatigue at bay.
Whether I was crossing mud, snow, or rocky trails, the included baskets and rubber tips kept me stable and confident. It’s a versatile, well-thought-out tool that packs a punch without the hefty price tag.
Overall, this is an impressive multi-use pole that really delivers. It’s perfect for anyone wanting a lightweight, all-in-one hiking tripod that won’t weigh down your pack or break the bank.
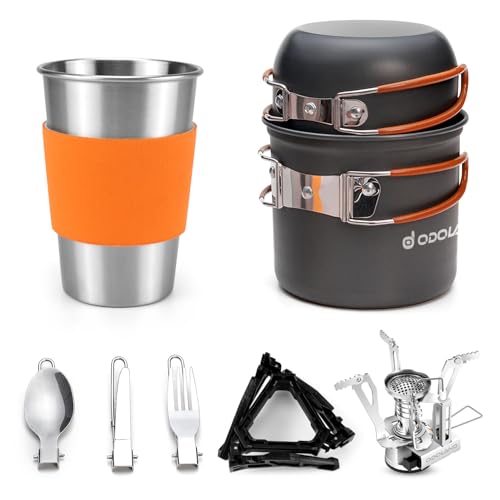
Odoland Camping Cookware Stove & Canister Stand Kit
- ✓ Compact and lightweight
- ✓ Easy to store and carry
- ✓ Durable non-stick pots
- ✕ Limited cooking power
- ✕ Smaller size for groups
| Material | Non-toxic anodized aluminum |
| Pot Capacity | 2 aluminum pots (size not specified) |
| Stove Type | Mini foldable camping stove |
| Cup Capacity | 16oz (473ml) |
| Handle Features | Foldable, anti-slip, and heat-resistant |
| Included Accessories | Spoon, fork, knife, stainless steel cup, silicone cup protector, carry bags |
Compared to other camping cookware sets I’ve handled, this Odoland kit immediately stands out with its compact design and thoughtful features. The foldable stove and handles make packing a breeze, unlike bulkier options that take up too much space in your backpack.
The mini stove is surprisingly sturdy, with a solid build that conducts heat efficiently. It folds flat, so you won’t struggle to fit it into your gear.
The aluminum pots are lightweight but durable, with non-stick surfaces that make cooking and cleaning much easier.
What really impressed me are the anti-slip and anti-heat handles. They stay cool while cooking, protecting your hands from burns, which is a huge plus during quick setups or when multitasking.
The stainless steel cup is a good size, and the silicone protector keeps it safe from scratches and heat.
All items fit neatly into the mesh bag, making it super portable for camping trips, hikes, or picnics. The set feels well-made without the hefty price tag, offering good value for budget-conscious adventurers.
That said, the stove’s power might be limited for boiling large quantities quickly, and the small size isn’t ideal for big groups. Still, for solo or duo trips, this kit covers all the essentials with ease and convenience.
ULTripod Trekking Pole Camera Adapter

- ✓ Ultra-lightweight design
- ✓ Easy to attach and use
- ✓ Compact and portable
- ✕ Does not include trekking poles
- ✕ Limited to certain pole diameters
| Material | High-quality aluminum alloy |
| Weight | 2.3 ounces (65 grams) |
| Maximum Pole Tip Diameter Compatibility | 11mm to 13.5mm |
| Connection Type | 1/4″-20 male thread |
| Adjustable Leg Angle | 25 degrees |
| Support System Compatibility | Compatible with trekking poles as tripod legs |
Many folks assume that using trekking poles as a camera tripod means sacrificing stability or convenience. I found that to be a misconception once I actually set up the ULTripod Trekking Pole Camera Adapter in the field.
It’s surprisingly straightforward to attach and quickly transforms a pair of trekking poles into a makeshift tripod.
The adapter itself is incredibly light—just 2.3 ounces—so it doesn’t weigh down your pack or your arms during long hikes. I appreciated how easy it was to clamp onto poles with diameters from 11mm to 13.5mm, thanks to the thumb screw that kept everything snug.
The 1/4″-20 connection point on top is a standard size, making it compatible with most cameras and accessories.
Setting it up on the trail took seconds. The legs extend outward to 25 degrees, giving me just enough angle to stabilize my shot on uneven terrain.
Folding it back was just as simple, which makes it perfect for quick shots or packing away in a hurry. The aluminum construction feels sturdy but lightweight, so I wasn’t worried about durability during my hikes.
The biggest win? Its compact size.
It fits easily into my gear bag, and I could use it on varied terrain without fuss. It’s a real game-changer for travel photographers who need a versatile, budget-friendly option.
The lifetime warranty adds peace of mind, knowing it’s built to last. Overall, this adapter offers an innovative, practical solution that delivers on stability without adding bulk.
Ulanzi TT35 Hiking Stick Tripod Kit, Travel Camera Monopod,

- ✓ Lightweight and portable
- ✓ Quick setup and switching
- ✓ Versatile, multi-function design
- ✕ Slightly limited load capacity
- ✕ Plastic components could be sturdier
| Material | Carbon fiber and aluminum alloy |
| Weight | 1.16 kg |
| Maximum Load Capacity | 5 kg |
| Maximum Height | 146 cm |
| Tripod Length | 23.5 cm |
| Adjustable Height Range | 47 cm to 130 cm |
You’re standing on a mountain trail, camera in hand, ready to capture that perfect sunset view. As you pull out the Ulanzi TT35 kit, you notice how compact and lightweight it feels in your pack—just 1.16kg.
It’s a game changer for outdoor photography, especially when every ounce counts.
The tripod’s carbon fiber and aluminum alloy build makes it sturdy yet surprisingly easy to carry around. When you extend the adjustable legs, the maximum height of 146cm lets you shoot comfortably even in uneven terrain.
The quick-release ball head rotates smoothly, giving you seamless panoramic shots without fuss.
Switching from tripod to monopod or selfie stick happens in seconds thanks to the quick-release system. The three trekking poles are versatile, adjustable from 47cm to 130cm, making them perfect for different scenarios.
You appreciate the ergonomic buckle, which lets you change height effortlessly without missing a beat.
Setting up the tripod is straightforward, and the adjustable wrist strap keeps everything secure. The small tripod, at just 23.5cm, is perfect for tabletop shots or low angles.
Whether you’re capturing long exposures, videos, or panoramas, this kit adapts to your needs easily, making outdoor photography more flexible and fun.
Overall, the Ulanzi TT35 offers a great balance of portability, versatility, and solid performance. It’s a smart choice if you want a budget-friendly, multi-use hiking tripod that doesn’t compromise on features or quality.
What Features Should You Consider When Choosing a Budget Hiking Tripod?
When choosing a budget hiking tripod, several features are essential to ensure it meets your needs while remaining affordable.
- Weight: A lightweight tripod is crucial for hiking, as it should not add significant burden to your backpack. Look for materials like aluminum or carbon fiber that offer a good balance between durability and weight.
- Height Adjustment: The ability to adjust the height of the tripod is important for getting the right angle for your shots. A good budget tripod should have a range that accommodates both low-angle shots and higher perspectives, typically extending to around 55-65 inches.
- Stability: Stability is key for clear photographs, especially in windy conditions or uneven terrain. Budget tripods should have sturdy legs with rubber feet to prevent slipping and to provide a solid base on various surfaces.
- Leg Locks: The locking mechanism of the tripod legs is crucial for ease of use and reliability. Twist locks or flip locks should be easy to operate with one hand and should securely hold the legs in place without slipping.
- Head Type: The tripod head is where the camera mounts, and there are different types such as ball heads and pan-tilt heads. For budget options, a lightweight ball head can provide good flexibility for adjusting angles quickly without compromising stability.
- Folded Size: When hiking, compactness matters as it affects how easily you can carry the tripod. Look for a tripod that folds down to a manageable size, ideally under 20-24 inches, to fit comfortably in your backpack.
- Material Quality: While budget tripods may not feature premium materials, they should still be built to withstand outdoor conditions. Check for corrosion-resistant finishes and overall build quality to ensure longevity despite being cost-effective.
- Price: Finally, consider your budget but understand that the cheapest option may not always be the best in terms of performance and durability. A good quality budget tripod should typically fall within the $50 to $150 range, providing a balance between affordability and functionality.
How Does Weight Affect Your Choice of Tripod?
The weight of a tripod is a crucial factor when selecting the best budget hiking tripod, as it impacts portability and stability during outdoor activities.
- Material: The material of the tripod significantly affects its weight. Aluminum tripods are usually heavier but more affordable, while carbon fiber tripods are lighter and more expensive, making them ideal for long hikes where every ounce counts.
- Size and Collapse Length: The size of the tripod when extended and its collapse length are important to consider. A compact tripod that folds down to a smaller size is easier to carry in a backpack, while a larger tripod may offer more stability but can be cumbersome during hikes.
- Load Capacity: The load capacity will influence the choice based on the weight of your camera and gear. A lightweight tripod may not support heavier equipment, leading to instability, while a heavier tripod can provide the necessary support but adds to the overall weight you need to carry.
- Leg Sections: The number of leg sections in a tripod affects both its weight and stability. Tripods with more leg sections tend to be lighter and more portable, but they may also be less stable compared to those with fewer sections that offer a sturdier setup.
- Accessories and Features: Additional features such as a built-in ball head or quick-release plates can add weight. While these features can enhance usability, it’s essential to balance the convenience they offer with the additional weight they may contribute to your hiking gear.
Why Is Material Important for Budget Tripods?
Material is important for budget tripods because it directly influences the tripod’s weight, durability, and stability, which are crucial for outdoor activities like hiking.
According to a study by the Outdoor Industry Association, consumers prioritize lightweight and durable materials when selecting equipment for hiking, as these factors can significantly affect the ease of transportation and performance in various terrains (Outdoor Industry Association, 2021). For budget tripods, common materials include aluminum and plastic, which offer a balance between affordability and functionality.
The underlying mechanism involves the trade-off between cost and performance; while carbon fiber tripods are lighter and more stable, they are often prohibitively expensive for budget-conscious consumers. Aluminum, though heavier, provides a reasonable compromise, allowing users to access a sturdy tripod without breaking the bank. Additionally, the choice of material impacts the tripod’s ability to withstand environmental conditions such as wind and moisture, which can lead to potential failures if not adequately addressed. Therefore, selecting the right material is essential for ensuring that budget tripods meet the needs of hikers while remaining within a manageable price range.
What Are the Key Benefits of Using a Tripod While Hiking?
The key benefits of using a tripod while hiking include stability, versatility, and improved photography quality.
- Stability: A tripod provides a stable platform for your camera, reducing shake and allowing for sharper images, especially in low-light conditions or when using long exposure settings.
- Versatility: Tripods can be adjusted to various heights and angles, making it easier to capture unique perspectives and compositions that would be challenging to achieve by hand.
- Improved Photography Quality: With the ability to set up the camera and compose shots more thoughtfully, hikers can take advantage of the tripod to create well-framed images, resulting in higher-quality photos that capture the beauty of the landscape.
- Self-Portraits: Using a tripod allows hikers to include themselves in their photographs without needing a fellow hiker to take the picture, making it easier to document the journey.
- Time-Lapse and Long Exposures: For those interested in capturing time-lapse videos or long exposure shots of moving water or clouds, a tripod is essential for keeping the camera steady over extended periods.
How Can a Tripod Enhance Your Photography Experience?
A tripod can significantly improve your photography experience, particularly when hiking, by providing stability, versatility, and ease of use.
- Stability: A tripod ensures that your camera remains steady, reducing the risk of blurry images caused by camera shake. This is especially important when shooting in low light conditions or using slow shutter speeds, as the stability allows for sharper images without the need for higher ISO settings.
- Versatility: Many tripods come with adjustable heights and angles, allowing you to shoot from various perspectives and compositions. This versatility is beneficial for capturing landscape shots or unique angles that would be difficult to achieve without a stable platform.
- Long Exposure Shots: A tripod is essential for long exposure photography, which requires the camera to remain completely still for extended periods. This technique can create stunning effects, like smooth water or light trails, which are difficult to achieve without the stability a tripod provides.
- Self-Portraits and Group Photos: With a tripod, you can easily include yourself in photographs without needing to ask someone else for help. Many tripods come with remote controls or smartphone connectivity, allowing you to set up your shot and capture it on your own.
- Improved Composition: Using a tripod encourages you to take your time when composing a shot. It allows you to carefully frame your subject and adjust your settings without feeling rushed, resulting in more thought-out and visually appealing photographs.
What Stability Advantages Does a Tripod Provide on Uneven Terrain?
A tripod offers significant stability advantages on uneven terrain, making it an essential tool for outdoor photography and videography.
- Three-Point Support: A tripod’s three legs create a stable base that can adapt to uneven ground, ensuring that the camera remains level and steady. This design allows each leg to be independently adjusted in length, accommodating varying ground heights and slopes.
- Weight Distribution: The design of a tripod allows for even weight distribution across its legs, minimizing the risk of tipping over on inclines or rocky surfaces. This balance is crucial when capturing images or video in challenging conditions, providing a secure platform for your equipment.
- Reduced Camera Shake: By providing a stable platform, a tripod significantly reduces camera shake, which is particularly beneficial when using long exposure times or telephoto lenses. This stability ensures sharper images, especially in low-light situations or when capturing distant subjects.
- Enhanced Flexibility: Many tripods come with adjustable leg angles, which means they can be positioned to accommodate steep or rugged terrain. This flexibility allows photographers to maintain a level shot even when the ground is not flat, enhancing composition options.
- Increased Height Options: Tripods can often be extended to various heights, allowing users to shoot from different perspectives without the need for a ladder or other supports. This is particularly useful in uneven landscapes where finding a suitable vantage point can be challenging.
What Are the Most Recommended Budget Hiking Tripods?
The most recommended budget hiking tripods include:
- AmazonBasics Lightweight Tripod: This tripod is known for its affordability and portability, making it an excellent choice for beginner hikers. It weighs only 2.2 pounds and can extend up to 60 inches, providing a good balance between height and stability.
- Neewer Carbon Fiber Tripod: A budget-friendly option with a lightweight carbon fiber construction that minimizes weight while maximizing durability. It features a quick-release plate and can hold up to 33 pounds, making it suitable for heavier cameras and equipment.
- Joby GorillaPod 3K: This unique tripod offers flexible legs that allow you to secure your camera to a variety of surfaces, including trees and rocks. Its compact design makes it easy to carry on hikes, and it can support up to 6.6 pounds, providing versatility for different shooting conditions.
- Vanguard Alta Pro 2+ Tripod: Although slightly higher in price, this tripod is praised for its adjustable multi-angle central column and solid construction. It provides excellent stability on uneven terrain and can support a considerable amount of weight, making it ideal for photographers who need reliable performance.
- Manfrotto Compact Action Tripod: Designed for travel, this tripod is lightweight and features a quick-release system for easy setup. It has a unique joystick head that allows for precise adjustments, making it a great budget option for casual photographers on the go.
Which Models Offer the Best Quality for the Price?
When searching for the best budget hiking tripod, several models stand out for their quality and affordability:
- AmazonBasics Lightweight Tripod: This tripod is a popular choice due to its low price and decent stability.
- Manfrotto Befree Advanced Travel Tripod: Known for its compact design, this tripod balances portability with performance.
- Joby GorillaPod 3K: Featuring a flexible leg design, this tripod is versatile and can adapt to various terrains.
- Neewer Carbon Fiber Tripod: This model offers lightweight construction and excellent durability, making it a solid investment.
The AmazonBasics Lightweight Tripod is an excellent entry-level option, providing a maximum height of 60 inches and a three-way head for easy adjustments. It is designed for lightweight cameras and is perfect for casual hikers looking to capture quality shots without breaking the bank.
The Manfrotto Befree Advanced Travel Tripod is ideal for hikers who want a sturdy yet compact option. Weighing only 3.5 pounds, it folds down small enough to fit in a backpack while still providing reliable support for DSLRs and mirrorless cameras, along with quick-release plates for efficient setup.
The Joby GorillaPod 3K is unique due to its flexible legs that can wrap around branches or uneven surfaces, making it perfect for adventurous photographers. Its lightweight and portable design allows for easy transport, while its ability to hold up to 6.6 pounds ensures compatibility with a wide range of cameras.
The Neewer Carbon Fiber Tripod combines strength and lightweight features, making it an excellent choice for those who prioritize durability in their gear. Priced competitively, it boasts a maximum load capacity of 33 pounds and can extend to 67 inches, giving photographers both versatility and reliability for various shooting conditions.
How Do Tripod Features Impact Performance and Usability?
Tripod features significantly influence both performance and usability, especially for budget hiking tripods.
- Weight: A lightweight tripod is essential for hiking, as it reduces the overall load. Many budget hiking tripods use aluminum or carbon fiber materials to balance sturdiness and portability, making them easier to carry over long distances.
- Height Adjustment: The ability to adjust the height of a tripod is crucial for capturing different angles and perspectives. Budget tripods typically offer adjustable legs with multiple sections, allowing users to quickly adapt to varying terrain and shooting situations.
- Stability: Stability is a key feature that affects image sharpness and overall performance. Budget hiking tripods often come with rubber feet or spikes that help grip uneven surfaces, reducing vibrations and ensuring steadiness when capturing images in challenging conditions.
- Head Type: The type of tripod head determines how easily you can adjust your camera’s position. Many budget options feature ball heads or pan-tilt heads that allow for smooth and precise movements, making it easier to frame shots without hassle.
- Durability: Durability is crucial for hiking tripods that will face outdoor conditions. Budget tripods may use weather-resistant materials or protective coatings to withstand moisture and dirt, ensuring they perform well in various environments.
- Ease of Setup: A tripod that is easy to set up and take down enhances usability during hikes. Many budget models incorporate quick-release leg locks and simple mechanisms that allow for fast adjustments, enabling you to capture spontaneous moments without delay.
- Portability: The design and foldability of a tripod affect its portability. Budget hiking tripods are often designed to fold compactly, making them easy to fit into a backpack while still providing the necessary height and stability for photography.
What Maintenance Tips Can Help Extend the Life of Your Budget Hiking Tripod?
To extend the life of your budget hiking tripod, consider the following maintenance tips:
- Regular Cleaning: Keeping your tripod clean is essential for longevity. After each hike, wipe down the legs and joints with a damp cloth to remove dirt, sand, and moisture that could lead to corrosion or stiffness.
- Proper Storage: Store your tripod in a dry, cool place when not in use. Avoid leaving it in damp environments or extreme temperatures, as this can weaken the materials and lead to damage over time.
- Check and Tighten Components: Periodically inspect your tripod for loose screws or joints. Tightening these components will ensure stability and prevent wear and tear during use, which is especially important when using the tripod on uneven terrain.
- Use a Tripod Bag: Transport your tripod in a padded tripod bag to protect it from impacts and scratches. This extra layer of protection is beneficial when hiking in rugged areas where it might bump against rocks or other hard surfaces.
- Avoid Overloading: Always adhere to the weight limit specified by the manufacturer. Overloading a budget tripod can lead to bending or breaking, significantly reducing its lifespan and performance.
- Lubricate Moving Parts: If your tripod has any moving parts, such as pan/tilt heads, apply a suitable lubricant occasionally. This will keep the mechanisms operating smoothly and prevent them from seizing up due to dirt or dust accumulation.
How Should You Clean and Store Your Tripod Properly?
To ensure longevity and optimal performance of your tripod, proper cleaning and storage are essential.
- Regular Cleaning: After each use, especially in outdoor conditions, wipe down the legs and head of the tripod with a soft, damp cloth to remove dirt and moisture.
- Use of Compressed Air: For removing dust and debris from hard-to-reach areas, using a can of compressed air can effectively clean the joints and locks without damaging the tripod.
- Inspect for Damage: Regularly check for any scratches, wear, or damage to the tripod components, such as the legs, head, and locking mechanisms, to ensure they are functioning properly.
- Proper Drying: If your tripod gets wet, make sure to dry it thoroughly before storing it to prevent rust or mold, especially on metal parts.
- Safe Storage: Store your tripod in a cool, dry place, preferably in a padded bag or case, to protect it from accidental damage and environmental factors.
- Avoid Extreme Temperatures: Keep the tripod away from extreme temperatures, as excessive heat or cold can affect the materials and mechanisms, leading to potential breakage.
- Regular Maintenance: Lubricate the moving parts occasionally with appropriate lubricants to ensure smooth operation and prevent sticking or jamming.
Regular cleaning will help maintain the appearance and functionality of your tripod, especially if you frequently use it for hiking or outdoor photography. Using compressed air can effectively eliminate dust without scratching delicate parts, while inspecting for damage helps preemptively address any issues before they escalate. Proper drying and safe storage are crucial in preventing long-term damage, while avoiding extreme temperatures will ensure the durability of the materials used in your tripod. Regular maintenance through lubrication will keep your tripod operating smoothly for years to come.
What Mistakes Should You Avoid When Buying a Budget Hiking Tripod?
When purchasing a budget hiking tripod, avoiding certain mistakes can enhance your experience and satisfaction with your choice.
- Ignoring Weight and Portability: It’s essential to consider the weight of the tripod, especially for hiking. A tripod that is too heavy can become cumbersome on long treks, leading to discomfort and fatigue.
- Neglecting Stability Features: Budget tripods often compromise on stability. Ensure the tripod has sturdy legs and a reliable locking mechanism to prevent it from wobbling during use, which can affect your photography results.
- Overlooking Material Quality: The materials used in a tripod significantly impact its durability and performance. Opt for tripods made from aluminum or carbon fiber, as they provide a good balance between weight, strength, and cost.
- Failing to Check Height Adjustability: Not all tripods offer the same height range. Choose a tripod that can extend to a height suitable for your needs to ensure comfortable shooting angles and prevent strain.
- Disregarding Compatibility with Equipment: Ensure that the tripod you choose is compatible with your camera or smartphone. Check the weight capacity and mounting options to avoid damaging your equipment.
- Not Considering the Head Type: The head of the tripod is crucial for stability and ease of use. Different heads, such as ball heads or pan-tilt heads, offer various functionalities, so select one that fits your shooting style and preferences.
- Ignoring User Reviews: User reviews provide valuable insights into the real-world performance of a tripod. Take the time to read reviews to uncover potential issues and gauge overall satisfaction from other users.
- Rushing the Purchase Decision: Take your time to research and compare different models before making a decision. Rushing can lead to purchasing a tripod that does not meet your needs or expectations.
How Can Overlooking Weight and Size Affect Your Hiking Experience?
Overlooking weight and size when selecting a hiking tripod can significantly impact your hiking experience.
- Portability: A lightweight and compact tripod is easier to carry, especially during long hikes where every ounce counts. If your tripod is too heavy or bulky, it can cause fatigue and detract from your overall enjoyment of the hike.
- Stability: Larger tripods can offer more stability, but they may not be practical for hiking. A tripod that is too large may sway in the wind or be difficult to set up on uneven terrain, making it less effective for capturing steady shots.
- Versatility: The size of the tripod can limit where you can use it. A smaller tripod can be used in tighter spaces or on rocky surfaces, whereas a larger one may be cumbersome and restrict your ability to find the best angles for photography.
- Setup Time: A heavier, more complex tripod may require more time to set up. This can disrupt your hiking flow, forcing you to spend more time fiddling with gear rather than enjoying the scenery and the hike itself.
- Durability vs. Weight: While you want a lightweight tripod, it’s important to ensure it’s durable enough for outdoor use. A tripod that compromises on weight may not withstand rugged conditions, leading to potential breakage and disappointment during your hike.